Logman 日誌收集說明
Logman 是一款 Windows 系統自帶的性能數據收集工具,可以定時收集系統的各種性能指標並保存為日誌文件。此說明文檔將指導你如何設置和使用 Logman 進行日誌收集、傳輸和管理。
1. 設置 Logman 日誌收集環境
目錄結構
首先,確保你的目錄結構如下:
logman_collection/
├── collectLog.bat
├── createLog.cmd
├── ftp-csv.txt (如使用FTP時需創建)
├── winscp-csv.txt (如使用WinSCP時需創建)
├── WinSCP/
│   ├── WinSCP.com
│   ├── WinSCP.exe
│   └── WinSCP.ini
├── sent/
└── backup/
2. 建立日誌收集和管理腳本
createLog.cmd
該腳本用於創建和啟動 Logman 任務,定期收集系統性能數據並保存為 CSV 文件。
logman.exe stop LogmanJob
logman.exe delete LogmanJob
logman.exe create counter LogmanJob -o c:\logman_collection\%COMPUTERNAME% -f csv -v mmddhhmm -c "\Numa Node Memory\Total MBytes" "\System\*" "\LogicalDisk(*)\*" "\Memory\*" "\Network Interface(*)\*" "\Paging File(*)\*" "\Processor(*)\*" -si 60
logman.exe start LogmanJob
collectLog.bat
該腳本負責停止 Logman 任務、移動已收集的日誌文件到 sent 資料夾、重新啟動 Logman 任務、使用 SCP 或 FTP 上傳日誌文件,以及刪除過期日誌文件。
@echo off
setlocal enabledelayedexpansion

:: 設定變數
set LOG_DIR=C:\logman_collection
set SENT_DIR=%LOG_DIR%\sent
set BACKUP_DIR=%LOG_DIR%\backup

:: 停止 Logman 任務,將 logman 前一小時收集的檔案 移到 sent 資料夾,再重新啟動收集
logman.exe stop LogmanJob
move /Y %LOG_DIR%\*.csv %SENT_DIR%
logman.exe start LogmanJob

:: [[使用WinSCP請將下行開頭 :: 移除]]
::(%LOG_DIR%\WinSCP\WinSCP.com /script="%LOG_DIR%\winscp-csv.txt") && (move /Y %SENT_DIR%\*.csv %BACKUP_DIR%) || (cls) && ( echo File not uploaded. Try later.)

:: [[使用FTP請將下行開頭 :: 移除]]
::(ftp -s:%LOG_DIR%\ftp-csv.txt | find /I "complete" >nul) && (move /Y %SENT_DIR%\*.csv %BACKUP_DIR%) || (cls) && (echo File not uploaded. Try later.)

:: 刪除 n 天前的舊檔案
FORFILES /P %BACKUP_DIR% /M *.csv /D -14 /C "cmd /c Del @PATH"

endlocal
3. 設置 WinSCP 或 FTP 上傳配置
WinSCP 配置文件
如需使用 WinSCP 上傳,請創建 winscp-csv.txt 文件,並按如下格式配置:
open scp://bimap:1qaz2wsx@10.99.1.106
cd /home/sftpuser/master
put C:\logman_collection\sent\*.csv
exit
需要修改的參數
bimap: 替換為實際的遠端用戶名。1qaz2wsx: 替換為實際的遠端用戶密碼。10.99.1.106: 替換為實際的遠端主機 IP 地址。/home/sftpuser/master: 替換為實際的遠端目錄路徑。
FTP 配置文件
如需使用 FTP 上傳,請創建 ftp-csv.txt 文件,並按如下格式配置:
open 10.99.1.106
sftpuser
1qaz2wsx
prompt
bin
quote pasv
lcd c:\logman_collection\sent
mput *.csv
bye
需要修改的參數
sftpuser: 替換為實際的 FTP 用戶名。1qaz2wsx: 替換為實際的 FTP 用戶密碼。10.99.1.106: 替換為實際的 FTP 伺服器 IP 地址。
4. 測試和驗證
手動測試腳本
- 以管理員身份運行 PowerShell 或命令提示字元:
- 按
Win + X,選擇 "命令提示字元 (管理員)" 或 "Windows PowerShell (管理員)"。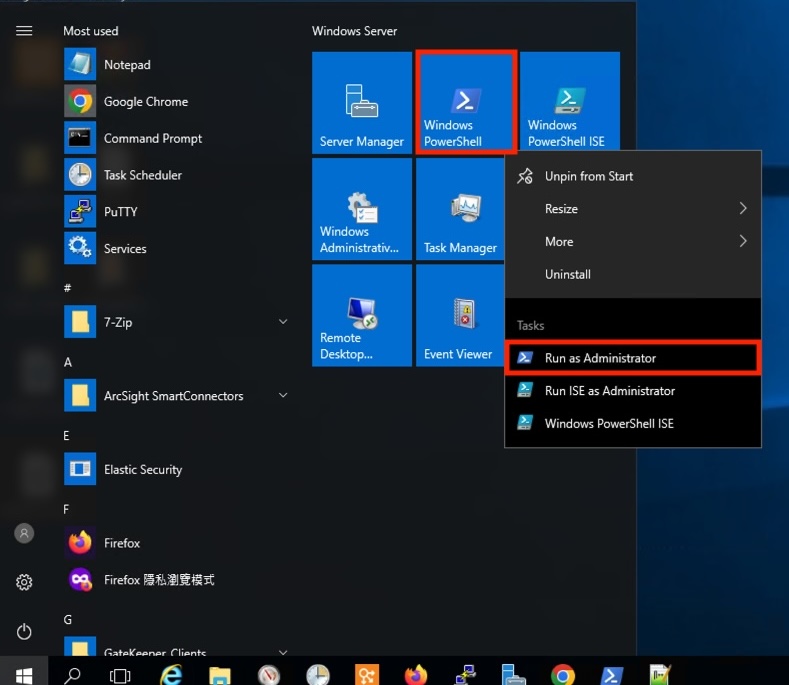
- 按
移動到腳本所在目錄:
cd C:\logman_collection運行
createLog.cmd腳本:.\createLog.cmd檢查是否生成 CSV 文件:
dir運行
collectLog.bat腳本進行日誌收集和上傳測試:.\collectLog.bat
5. 設置自動化排程
使用 schtasks 設定定期任務
每小時運行一次
collectLog.bat:schtasks.exe /create /RU "NT AUTHORITY\SYSTEM" /sc HOURLY /st 00:00 /tn "LogmanJob" /tr C:\logman_collection\collectLog.bat每天運行一次
collectLog.bat:schtasks.exe /create /RU "NT AUTHORITY\SYSTEM" /sc DAILY /st 00:00 /tn "LogmanJob" /tr C:\logman_collection\collectLog.bat
6. 驗證任務設置
確認任務是否成功添加:
PS C:\logman_collection> schtasks.exe /query /tn "LogmanJob"

Folder: \
TaskName                                 Next Run Time          Status
======================================== ====================== ===============
LogmanJob                                2024/8/8 上午 12:00:00 Running
日誌存放位置說明
- 每個整點會將上一個小時收集的日誌移動到
sent資料夾中等待傳送。 - 傳送成功後會移動到
backup資料夾中存放,一天會產生 24 個 CSV 檔案,若傳送失敗會保留在sent資料夾等待下一次傳送。 - 重新啟動收集的日誌會在
logman_collection資料夾重新產生。
注意事項
第一次使用 WinSCP 時的注意事項
第一次執行 WinSCP 腳本時,會提示是否信任遠端主機的指紋,輸入 "Y" 以信任並添加主機鍵到緩存:
PS C:\logman_collection> .\collectLog.bat
The command completed successfully.
C:\logman_collection\WIN-J8S43F1214B_08071427.csv
        1 file(s) moved.
The command completed successfully.
Searching for host...
Connecting to host...
Authenticating...
Continue connecting to an unknown server and add its host key to a cache?
The server's host key was not found in the cache. You have no guarantee that the server is the computer you think it is.
The server's ssh-ed25519 key fingerprint is:
ssh-ed25519 256 0c:f9:35:4e:ad:e5:62:d2:92:cb:3d:5b:f0:22:ea:2b
If you trust this host, press Yes. To connect without adding host key to the cache, press No. To abandon the connection press Cancel.
In scripting, you should use a -hostkey switch to configure the expected host key.
(Y)es, (N)o, C(a)ncel (5 s), (C)opy Key: Yes
Using username "bimap".
Authenticating with pre-entered password.
Authenticated.
Starting the session...
Session started.
Active session: [1] bimap@10.99.1.106
/home/sftpuser/master
WIN-J8S43F1214B_08071409. |          58 KB |    0.0 KB/s | binary | 100%
C:\logman_collection\sent\WIN-J8S43F1214B_08071427.csv
        1 file(s) moved.